
Product Details
Snuggle and Play Crochet: 40 Amigurumi Patterns for Lovey Security Blankets and Matching Toys
Free Shipping+Easy returns

Product Details
Lalylala’s Beetles Bugs and Butterflies: A Crochet Story of Tiny Creatures and Big Dreams
Free Shipping+Easy returns

Product Details
Crochet For Beginners: A Complete Step By Step Guide With Picture illustrations To Learn Crocheting The Quick & Easy Way
Free Shipping+Easy returns
Product Details
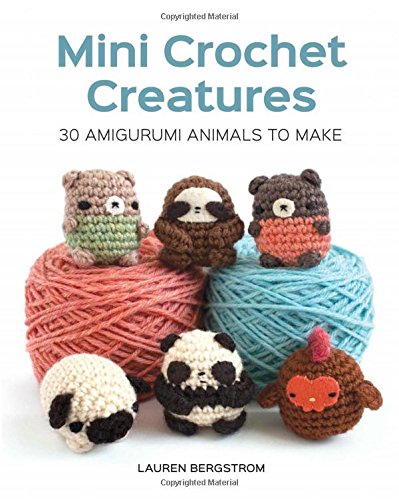
Mini Crochet Creatures: 30 Amigurumi Animals to Make
Free Shipping+Easy returns
Product Details
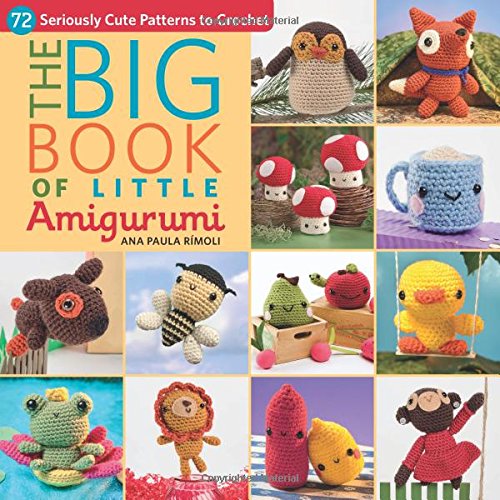
The Big Book of Little Amigurumi: 72 Seriously Cute Patterns to Crochet
Free Shipping+Easy returns

Product Details
Finley the Orange Fox – Amigurumi Crochet Stuffed Animal Toy Pattern and Tutorial (Twee Toys)
Free Shipping+Easy returns

Product Details
Literary Yarns: Crochet Projects Inspired by Classic Books
Free Shipping+Easy returns

Product Details
Fletcher the Fox – Amigurumi Crochet Stuffed Animal Toy Pattern and Tutorial (Twee Toys)
Free Shipping+Easy returns

Product Details
Itty Bitty Crocheted Critters: Amigurumi with Attitude!
Free Shipping+Easy returns

Product Details
Snowman – Amigurumi Crochet Pattern/ Stuffed Animal Tutorial /: snowman from the Disney movie Frozen, Olaf the snowman,
Free Shipping+Easy returns

Product Details
Crochet Characters Soft & Snuggly Cacti: 12 Succulent Designs
Free Shipping+Easy returns

Product Details
Mini Knitted Toys: Over 30 cute & easy knitting patterns
Free Shipping+Easy returns
LOVEY crochet PATTERN toy

THIS PATTERN IS AVAILABLE IN ENGLISH Now every caring mother can crochet this cute toy to her baby! * A toy for sleeping (soft and tender, created by the day of hugs with the baby) * A toy that protects the baby from night monsters * A toy that helps create coziness (after sleep, the child puts pajamas in it) * Toy No. 1, best seller! Handwork, which has become very popular among mothers! THIS PATTERN INCLUDES: – 31 pages of detailed description 70 high-quality photos video (body made of Puffy and pompon yarn) you can choose any option for knitting body. Two variants are written in the pattern! full decoration process, author secrets, notes and pieces of advice:)! This pattern is avalable in English in PDF format + 4 videos are in Russian, but actions are clear. You need access to the Internet to watch the videos. This pattern doesn’t contain crochet lessons; you need to have basic crochet skills to work by the pattern. Final size of the toy with the indicated yarn is 50-55 cm (19’6-21’6 inch). Skill level – intermediate PLEASE NOTE: PURCHASE OF THIS ITEM IS FOR A DIGITAL PDF CROCHET PATTERN , NOT THE ACTUAL FINISHED TOY in THE PHOTOS! After payment You will see a download link in the details of your order. You can download the file from your browser or from your computer. If you bought a file by mistake, the payment will be refunded only if the files were not downloaded. Due to the nature of the PDFs, I regret not being able to offer a refund. This template is for personal, non-commercial use only. Copying, distribution or commercial use of this template or any part thereof is prohibited. you can dispose of the finished toy, made on this model at its discretion. Wish to see some more designs? http://www.etsy.com/ru/shop/FavoritePlushToys – Less
tricochet

Let’s crochet this cute little brooch, a little darling hedgehog. Hope it will become your favorite. In fact, is there anyone not fond of hedgehogs? There are 3 ways how to make quills described in the pattern. To crochet hedgehog you would need: 1.\tBasic crochet skills: magic ring, single crochet, decrease, increase 2.\tMaterials: •\tYarn– basic: Uspeshnaya by Pekhorka, measuring 220 m/50 gr (257yds/1.76 oz) in white finer yarn for paws and nose Dandy by Kamteks measuring 330m/50gr ( 360yds/1.76 oz) in black and Vita Pelican 330/50( 360yds/1.76 oz) in pink Vita Pelican 330/50( 360yds/1.76 oz) in brown for quills or JinaTravkaPremium 150 m/100 gr (164 yds/3.5 oz) •\tCorresponding hooks. Mine are 1.3 mm (US size 10) and 0.75 (US size 12) •\tFiller •\tBlack DMC cotton thread to embroider the snout •\tAny means to add tone to cheeks and ears. I have a red lipstick and a blender brush. •\tScissors and needle •\tBrooch pin, mine is 2 cm (0.7 inch) •\tOptionally: pins, marker, sewing thread to attach the Travka yarn. 3.\tMy detailed crochet tutorial. Good mood as an addition. This crochet tutorial is written in English (US terms) and contains 10 pages and 50 crocheting and assembly process photos. Skill level – intermediate. If you use the materials, mentioned above, you’ll get a 5.5 (2.16 inch) cm brooch. Purchase of this pattern includes unlimited help from me should you run into any problems. Never hesitate to send me a message should you have any questions. Just hit a “conversation” button on Etsy or write me on Instagram @moi_prelesti . THIS LISTING IS FOR PDF PATTERN ONLY, NOT A FINISHED ITEM. NO CANCELLATIONS / REFUNDS CAN BE OFFERED ON DIGITAL PURCHASES ONCE THE FILE HAS BEEN DOWNLOADED. Copyright. ALL THE WORKS PRESENTED IN THIS DOCUMENT ARE SUBJECT TO COPYRIGHT, YOU MAY NOT USE THEM WITHOUT THE DESIGNER’S (MY) PERMIT. VIOLATION OF THIS TERM IS PUNISHABLE BY LAW. YOU ARE ALLOWED TO GIVE AS GIFT, SELL OR USE IN ANY WAY THE FINISHED WORK (I WOULD BE GRATEFUL IF YOU CREDIT ME AS PATTERN DESIGNER) Thank you and best regards, Liliya Sharipova.
cats

*THIS LISTING IS FOR A PATTERN ONLY – NOT A FINISHED PRODUCT.* CROCHET PATTERN \
Grace and Yarn

Fall has come and I’m in awe of the changing colors. While Spring is my all time favorite season, Fall is right behind. It’s quite rewarding to watch our surroundings slowly change in color, temperature and fresh rain smells! Fall also gives those cozy up and crochet feelings! Which is why this little turkey was on my heart to make! Add some eyelashes or cute little cheeks for a fun girl version too! For this pattern the head and body are made as one piece. For sewing we will have a few more extra parts with the individual feathers but they go quite quickly! If you’re new to amigurumi be sure to check out our Tips to Amigurumi and Stuffing pages, we’ll walk through the different techniques and methods together to get you rolling! Once you start making amigurumi it’s hard to stop! Pattern PIN here to save for later! Grab the ad-free PDF pattern in my Etsy or Ravelry shop! Don’t want to miss upcoming patterns? Sign up for our newsletter here to stay up to date on new patterns, tutorials and more! You can also join the Grace and Yarn Crochet Group on Facebook! This is a great place to ask questions, share your projects and interact with others who love to crochet! You may make and sell items made from this pattern but please do not sell, share or reproduce the actual pattern. If you sell finished items online (Etsy, etc) please provide a link to the pattern and credit to me as the designer, thank you. I hope you enjoy this pattern! This post contains affiliate links, please see our disclosure for more information. Thank you so much for supporting Grace and Yarn! Materials – Size 4 worsted weight yarn (50g of brown; small amount of yellow for the legs and beak, red for the wattle, and your choice of colors for the 4 feathers) 3.5 mm crochet hook (these are my favorites!) 9mm safety eyes Black crochet/embroidery thread for optional eyebrows/eyelashes Scissors Tapestry needle (the bent tip needles work wonders for amigurumi!) Stuffing Stitch markers Abbreviations – US terminology MC- Magic circle SC- Single crochet SC INC- Single crochet increase INV DEC- Invisible decrease DC – Double crochet Sl st – Slip stitch St(s)- Stitch(es) NOTES – – Slowly stuff as you go, you want it to be firm but not stretched. – You will be working in the round; I like to use a stitch marker at the beginning of each round. – The body and head will be made as one piece. Finished product is approximately 8 inches tall. Beak – With yellow Round 1: Create a magic circle with 6 SC Round 2: SC INC in each st around (12) Rounds 3-4: SC around (12) Fasten off leaving a long tail for sewing. Wattle – With red, chain 11 Row 1: SC in the 2nd chain from your hook, SC in the next 7, DC, 3DC in the last chain; working down the other side of the foundation chain DC in the next chain, SC in the remaining 8 chains. Fasten off leaving a long tail for sewing. Body – With brown Round 1: Create a magic circle with 6 SC Round 2: SC INC in each st around (12) Round 3: SC in the first st, SC INC in the next, rep around (18) Round 4: SC in the first 2 sts, SC INC in the next, rep around (24) Round 5: SC in the first 3 sts, SC INC in the next, rep around (30) Round 6: SC in the first 4 sts, SC INC in the next, rep around (36) Round 7: SC in the first 5 sts, SC INC in the next, rep around (42) Rounds 8-10: SC around (42) Round 11: SC in the first 5 sts, INV DEC in the next, rep around (36) Rounds 12-14: SC around (36) Round 15: SC in the first 4 sts, INV DEC in the next, rep around (30) Rounds 16-18: SC around (30) Round 19: SC in the first 3 sts, INV DEC in the next, rep around (24) Round 20: SC around (24) Round 21: SC in the first 2 sts, INV DEC in the next, rep around (18) Round 22: SC in the first st, INV DEC in the next, rep around (12) *We will now start the head* Round 23: SC in the first st, SC INC in the next, rep around (18) Round 24: SC in the first 2 sts, SC INC in the next, rep around (24) Round 25: SC in the first 3 sts, SC INC in the next, rep around (30) Round 26: SC in the first 4 sts, SC INC in the next, rep around (36) Round 27: SC in the first 5 sts, SC INC in the next, rep around (42) Rounds 28-34: SC around (42) Note – Here is where we will add the facial features before we start closing the head. Insert your safety eyes between rounds 31 and 32, 5 stitches apart. Optional – With black crochet/embroidery thread add eyebrows or eyelashes before securing the backs of your safety eyes. Next, sew your beak centered between the eyes adding a small amount of stuffing as you go. Lastly, sew the wattle starting at the top middle of your beak and ending a few stitches down the side of the beak. Allow the remaining portion of the wattle to hang below the beak. Round 35: SC in the first 5 sts, INV DEC in the next, rep around (36) Round 36: SC in the first 4 sts, INV DEC in the next, rep around (30) Round 37: SC in the first 3 sts, INV DEC in the next, rep around (24) *Continue to stuff the head firmly Round 38: SC in the first 2 sts, INV DEC in the next, rep around (18) Round 39: SC in the first st, INV DEC in the next, rep around (12) Round 40: INV DEC around (6) Fasten off and sew remaining part closed, weave in your end. Feathers on Top – To create the feathers or ‘fluff’ on top of our turkey’s head, create a slip knot with your brown yarn and attach with a slip stitch just to the side of the last round on your turkey’s head. Chain 9 and slip stitch into an adjoining stitch to the side (towards the middle), this creates one feather. Chain 9 again and slip stitch into an adjoining stitch again to the side. Repeat your chain 9 one additional time placing your slip stitch again to the side of the previous, this will align all 3 feathers to be in a centered row. Wings- With brown make 2 (I left mine unstuffed) Round 1: Create a magic circle with 6 SC Round 2: SC INC in each stitch around (12) Round 3: SC in the first st, SC INC in the next, rep around (18) Round 4: SC in the first 2 sts, SC INC in the next, rep around (24) Rounds 5-6: SC around (24) Round 7: SC in the first 2 sts, INV DEC in the next, rep around (18) Round 8: SC in the first st, INV DEC in the next, rep around (12) Rounds 9-12: SC around (12) At the end of round 12 pinch the wing flat and make 6 SC across the top to close, fasten off and leave a long tail to sew onto the body. Legs – With yellow make 2, stuffing as you go Round 1: Create a magic circle with 6 SC Round 2: SC INC in each st (12) Round 3: SC in the first st, SC INC in the next, rep around (18) Rounds 4-6: SC around (18) Round 7: SC in the first st, INV DEC in the next, rep around (12) Round 8: SC in the first 2 sts, INV DEC in the next, rep around (9) Rounds 9-15: SC around (9) Fasten off leaving a long tail for sewing. Feathers – With colors of choice make 4 – Do not stuff Round 1: Create a magic circle with 6 SC Round 2: SC INC in each stitch around (12) Round 3: SC in the first st, SC INC in the next, rep around (18) Round 4: SC in the first 2 sts, SC INC in the next, rep around (24) Rounds 5-7: SC around (24) Round 8: SC in the first 2 sts, INV DEC in the next, rep around (18) Round 9: SC around (18) Round 10: SC in the first st, INV DEC in the next, rep around (12) Rounds 11-16: SC around (12) At the end of round 16 pinch the feather flat and make 6 SC across the top to close, fasten off and leave a long tail to sew onto the body. Assembly – 1. First, sew your wings onto the body centered with your facial features at round 19. 2. Next, sew your legs centered onto the bottom of your turkey starting at round 2 and ending at round 6. 3. Lastly, sew your feathers onto the back of your turkey. I recommend pinning in place to find the desired angle and placement you would like. I angled my feathers outward sewing the two closest the neck first and then the next two last fanning outwards. For added strength sew across the bottom and up each side of the feathers approximately ½ inch. I hope you have enjoyed this pattern! For more small sized amigurumi projects be sure to check out Rosie the Reindeer
and our Mini Llama pattern! Thank you so much for stopping by, Stephanie
Crochet patterns amigurumi

Advertisements Quick, easy and cute amigurumi projects are the best! Jellyfish is definitely one of these. Even if you are just beginning your adventure with crochet, this project shouldn’t be a problem. It uses basic techniques and looks great! Make some today to bring smiles on the faces of your…
Art

Easy to follow crochet llama pattern with step by step photo tutorial! Great beginner pattern! Easy To Make Doily Free Crochet PatternThis new pattern is my first scarf pattern! This…You can easily make this beautiful crochet flower…
Art

Crochet Love – Página 30 – Free Patterns 31 Free Crochet Patterns That You will in Love withPopular Pinterest Patterns All Your FavoritesHaken haken love this